|
Thursday, March 30, 2000
10:00 A.M.
I arrived at Mikes at 10:00. We started by adding inside right
wing gusset and rib assembly.
|
|
11:40
Ready to rivet inside right wing gusset and rib assembly. At 12:00
we went to lunch.


|
|
1:00
Install long and short channel braces to far rib on wingtip.

|
|
1:30
Install wingtip rib and channel braces.

|
|
2:15
Use string to make sure alignment of ribs will be consistant.


|
|
2:30
Before riveting gussets, Mike trimmed the edges so they would not damage
the fabric during flight. Left is before as shipped from factory, right
is after Mike trimmed them. You do not have to do this because the
manual says to put tape over these edges, however this does remove some
weight without affecting safety.

|
|
2:35
Notice gap in rib before alignment (left), then after (right).
Make sure all is straight before you rivet in place. Using a
square, you can align using the spar as the base measurement.


|
|
2:45
Mike had to make an extra hole in gusset so that it would lay flat on
spar and still rivet rib to spar. This is an adjustment that Mike
made and you should not have to do this.

|
|
2:50
Many of the ribs needed to be filed down because of rough edges (left)
before (right) after. This is part of the 51% that the kit builder
is supposed to do. (Can't have Excalibur do all the work for us
now can we?)


|
|
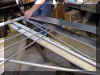
3:55
Ribs in trailing edge in place, ready for drilling, riveting.


|
|
5:15 P.M.
Finished for the day.
|


